Contact Lists
Overview
Contact lists allow you to segment your contacts when sending Blasts.
Note: Some users and account types may have this feature disabled by their administrator.
Create a List
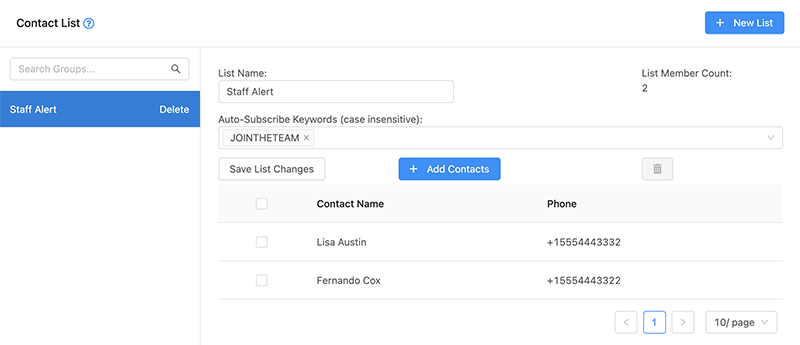
- Click "New List" button on the top right of the screen.
- Enter a name for the list and click "Add List"
- After making any changes, be sure to click "Save List Changes"
Edit a List
- Locate the list that you would like to edit on the left hand side.
- Click the list to view the edit details view.
Tip: List name is meant to be a user-friendly identifier. (e.g. "Staff Alert" or "September Promo")
Auto-Subscribe Keywords
A great way to build lists is to promote a subscription keyword to your contacts. When an Auto-Subscribe Keyword is received from a contact, that contact will be automatically added to the contact list.
Tip: To generate an auto-reply to a contact subscribing to the list via keyword, utilize the "Auto-Reply Keyword" on the Canned Response feature, setting the keyword to the same as your list subscription keyword.
Add Contacts to a List
You can manually add a contact to a list by:
- Identify and view / edit the list.
- Click "Add Contacts" to open the contact selection drawer.
- Check the checkbox next to any contacts that you want to add to the list.
- Click "Add Contacts"
Remove Contact from a List
- Choose the list that you would like to edit.
- Click the checkbox on the row that contains the contact(s) you would like to delete.
- Click the trash can icon to delete the selected contacts from the list.
Delete a List
To delete a contact list, simply locate the list you would like to delete and choose the "Delete" link on the right. You will be prompted to confirm deletion.
Related Articles
Contacts
Overview The contacts page allows you to manage your contacts and details like opt-out and consent message status, import in bulk, and more. Adding a Contact Click "New Contact" from the top right of the app. Next, enter in details, being sure to ...Conversations
Overview The conversations page of the application is where you will spend most of your time communicating with your contacts. Active conversations are listed on the left. You may view an individual conversation by selecting it from the list. When ...Drip Messages
Overview Drip campaigns allow you to apply a scheduled set of messages to a contact based on intervals of your choosing. Any replies received from the contact will break any future drips that have not yet been sent. Creating / Editing a Drip Campaign ...Away Messages
Overview Away messages act as auto-responders to inbound messages. When an away message is active and a message is received, the contact which sent the message will receive an automatic reply containing the away message as the body of the message. ...Number Switching
Overview The number switcher allows you to toggle between your phone number and other numbers that have been shared with your account. Note: Some users and account types may be limited to a single number. Switching Numbers To switch active numbers, ...