Number Switching
Overview
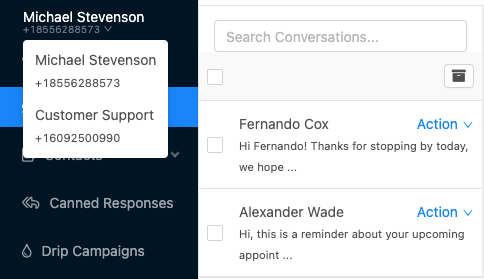
The number switcher allows you to toggle between your phone number and other numbers that have been shared with your account.
Note: Some users and account types may be limited to a single number.

Switching Numbers
To switch active numbers, simply click on the number switcher at the top left of the screen and select a number from the dropdown. The application will reload the current page content, according to the number that you selected.
Note: Switching to an account with a large number of active conversations or contacts may cause a period of delay where the app is downloading relevant conversations and contact data to your device.
Note: When sending a message on a shared number, the user that sent the messsage will be associated with the message so that you can identify who said what inside of a conversation. To view the sender name, you can hover over the message status label (e.g. "Sent" on the bottom right of an outbound message).
Related Articles
Conversations
Overview The conversations page of the application is where you will spend most of your time communicating with your contacts. Active conversations are listed on the left. You may view an individual conversation by selecting it from the list. When ...Reminders
Overview Create reminders to send scheduled messages to individual contacts. Tip: Dates that have messages scheduled have a blue dot identifer above the day number. Creating a Reminder Choose the date on the calendar for which you would like to ...Read First
This page contains a few important key bits on information that will help you have the best performance from the chat application If you have contacts that you would like imported, we suggest you import the contacts before you being using the app. ...Text Message Segment Information - Calculation
When using the Blast Feature of Voipcom Chat, you will be billed by message segment. This article explains the details of Message Segments What is a message segment? A text message segment is a set amount of characters that are part or all of a text ...Contacts
Overview The contacts page allows you to manage your contacts and details like opt-out and consent message status, import in bulk, and more. Adding a Contact Click "New Contact" from the top right of the app. Next, enter in details, being sure to ...