Auto Attendant
Office Manager - Auto Attendants
The Auto Attendants icon will take you to the auto attendant center, as seen in the figure below. Auto attendants are interactive voice recordings that allow callers to make selections in order to route their call to the desired destination.
- The most common use case for an auto attendant is having the main company phone number pointed to an auto attendant. When callers then call into the business, they can be routed to the party they are trying to reach by listening to the menu prompt options or dialing a user’s extension directly.
- Clicking the Auto Attendants icon on the top of the manager portal navigation options will take you to your auto attendant center.
- Here you can edit existing auto attendants, delete them, and create new ones.
Creating a new Auto Attendant
Then select a Time Frame for the Auto Attendant to be in effect.
Click Add to create the Auto Attendant.
Intro Greeting
Once the Auto Attendant has been created Click the Intro to record the first message the caller will here.
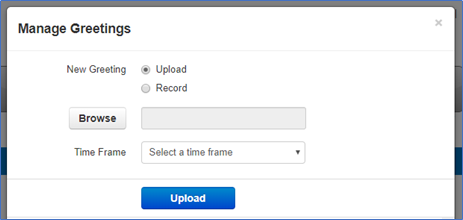
Clicking on the speaker next to the Manage Greetings will display he Manage Greetings window as seen below. Here you can Upload a new intro greeting or record a new one. Then you can select a time frame for that message so it will only play during the selected time frame.
Menu Prompt
Clicking the speaker icon next to Menu Prompt option as seen in figure below will allow you to record a message letting callers know what digits will route them to what application or destination.
Dial Pad Menu
The Dial Pad Menu options as seen in figure below is where you configure what digits correlate with an application. When you select a digit, you will see the applications you can choose from. Click on a digit and you will see the applications you can assign to it. When clicking on a digit and selecting an application you can see the options you can configure the application with.
User
The User application as seen below will allow you to forward the caller to an extension on the system of another user. It will also give you the option to add a prefix to the call ID so the user that call is being forwarded to knows the call is being routed from an auto attendant.
Conference
The Conference option as seen below will allow you to forward the call to the conference bridge you enter into the Enter bridge name, extension option field.

Call Queue
- It also allows you to have the system announce the number of callers in the queue ahead of the caller.
- Or announce the average expected wait time.
- It also allows for a Caller ID prefix to be added so the agent in the queue knows the call was routed to them from an Auto Attendant.
Directory
Voicemail
Voicemail Management
External Number
Play Message
Add Tier
Options
Related Articles
How to Configure and use Analytics
Using Analytics To access analytics, log into the Portal with a User Scope that has already been given access to Call Center features and navigate to the Call Center Home. Then click on the analytics button to launch the app. You can also access and ...Basic User Guide
Basic User Guide PDF